Sites
Much like when you're not using PyHost to host a site, a server can have as many sites on it as you like (or the server can handle). This means that once you have one server then deploying 4 or 5 sites to it and managing them all through PyHost not only possible but simple.
Creating a Site
When you want to create a site you'll be faced with this form.
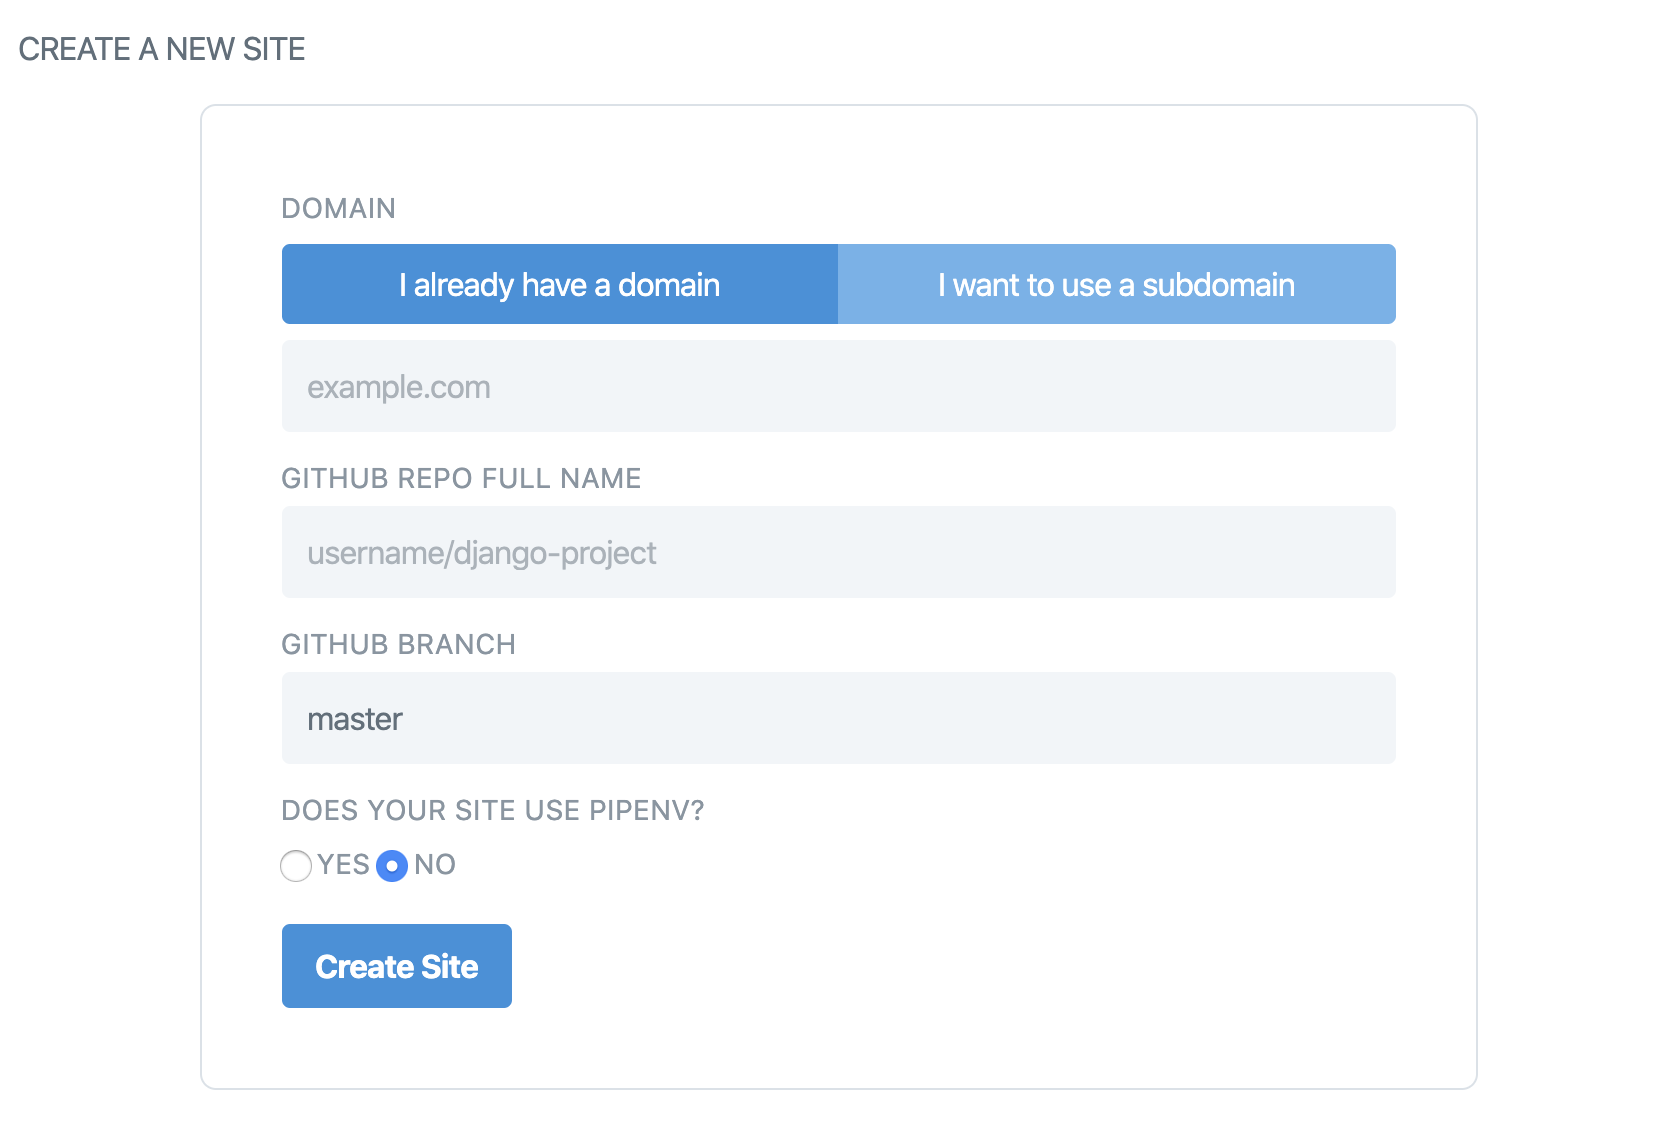
In order to create a site, you will need to fill in the form on the main server page. There are two different routes you can take and the form takes 4 pieces of information:
Domain
As a subdomain of PyHost
If you do not have a domain ready for your site then you can use a Pyhost subdomain. If select the "I want to use a subdomain" option then you will only need to enter the URL prefix of the domain. If, for example, you enter my-new-site into the box then your site will be deployed at http://my-new-site.pyhost.io. One limitation is that you won't be able to have an SSL certificate for the site, but this will change in the future.
With a custom domain
If you have a custom domain that you want to use for your new site then you can enter it in the box with the "I already have a domain" option selected. The domain of your new site e.g. testsite.com. This domain mustn't contain http(s):// and PyHost will not allow it.
Git Repository
The name of your Git repository. This will consist of your git host username or organisation, then a slash, then a repository name. For example, if I want to connect a repo which is found at the URL: https://github.com/pyhost-app/new-django-app then the repo name would be pyhost-app/new-django-app.
Name of the branch you wish to deploy
The name of the branch which you want to deploy from, e.g. master.
Other Information
Whether your site uses PipEnv or not. If in doubt then leave this as the default no. If your site does use it, then be sure to set this to yes as this affects how your site installs dependencies.
Once you've filled out the form correctly you'll be taken to the site page!
The Site Page
This is where you can initialize your new site and make PyHost run the set up for your site and make the changes on your server. Then, after that is complete you can use this page for a whole host of other actions which help ease the management of your new site.
This page, much like the server page has two states: Initialized and uninitialized.
Uninitialized
Your site's just been added through the form and you've not hit that all-important 'Initialize Site' button yet. At this point there's not much else to do but hit the button and let PyHost do its magic. Once you've got the green light from the initialization process then your page will change and you'll have plenty more options.
Initialized
Your site's ready to go! You might not have your assets working yet and no SSL but your site's there (assuming that all the DNS is configured correctly, If not then a handy trick is to edit the hosts file on your machine to fake the DNS for your computer)
Collect Static
If you ever need to update the static files (images, styles, JavaScript etc.) on your site then you can do so easily with the 'Collect Static' button on the Site page. This will essentially run the collect-static command on your site which is responsible for moving your assets to the location for the web server to be able to use them. If this job fails at all then it is probably to do with your settings file(s) so tweaking the STATIC settings should resolve this issue. You can run this command as many times as you like, so you can always have a redo.
SSL
You'll notice that on this initialized sites page there is an "SSL" tab. This is where you can get an SSL for your site with the click of a button using LetsEncrypt (All other methods are still available to you e.g. using Cloudflare, this is just a convenience for speedy deployment.) You simply need to click on the padlock and PyHost will go off and do the hard work for you and you'll have an SSL in minutes.